Direkt zum Inhalt
So verdrahten Sie ein DC-DC-Ladegerät
Wenn Sie die Energieübertragung in einem Gleichstromsystem optimieren möchten, ist ein DC/DC-Ladegerät eine unverzichtbare Komponente. In diesem Artikel erfahren Sie Schritt für Schritt, wie Sie ein DC/DC-Batterieladegerät anschließen. Von den Grundlagen bis hin zum korrekten Anschluss – wir erklären Ihnen alles, was Sie für eine erfolgreiche Installation wissen müssen.
DC/DC-Ladegeräte verstehen
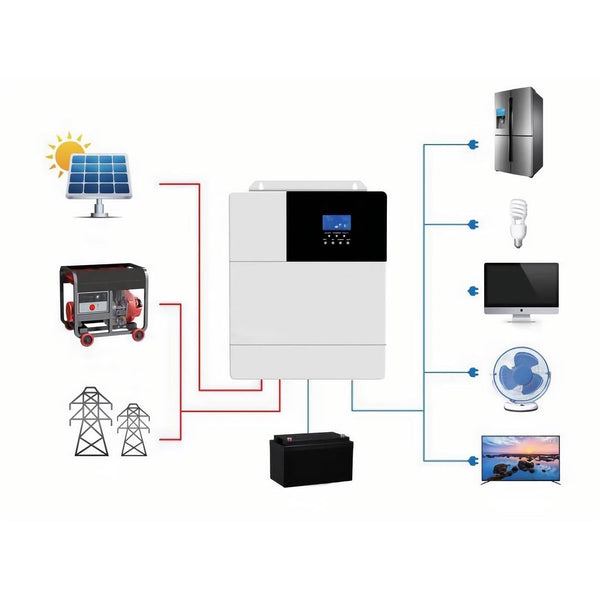
Bevor wir uns mit der Verkabelung befassen, wollen wir kurz erklären, was ein DC/DC-Ladegerät ist und welche Vorteile es bietet. Ein DC/DC-Ladegerät für Lithiumbatterien wandelt die Spannung von einer Gleichstromquelle in eine andere um und ermöglicht so das effiziente Laden von Zusatzbatterien in Fahrzeugen, Booten oder netzunabhängigen Systemen. Es gewährleistet eine optimale Energieübertragung und schützt Ihre Hauptbatterie vor Tiefentladung.
Besorgen Sie sich die notwendigen Werkzeuge und Materialien
Zum Verkabeln eines DC/DC-Ladegeräts benötigen Sie die folgenden Werkzeuge und Materialien:
- DC/DC-Batterieladegerät
- Primärbatteriekabel
- Zusatzbatteriekabel
- Passende Sicherungen und Sicherungshalter
- Abisolierzangen
Crimpwerkzeug
- Schrumpfschlauch
- Isolierband

Planen Sie die Verkabelung
Planen Sie vor Beginn der Verkabelung die Installation, um einen effizienten Stromfluss und Sicherheit zu gewährleisten. Berücksichtigen Sie den Standort der Haupt- und Zusatzbatterien, die benötigte Kabellänge und mögliche Hindernisse oder Störungen.
Verdrahtungsprozess
Hier ist eine Schritt-für-Schritt-Anleitung zum Verkabeln eines DC-DC-Ladegeräts:
- Wählen Sie das richtige Ladegerät: Wählen Sie ein DC/DC-Ladegerät, das mit Ihrem Batterietyp kompatibel ist und die entsprechende Ladekapazität für Ihren Bedarf hat.
- Positionieren Sie das Ladegerät: Entscheiden Sie, wo Sie das Ladegerät in Ihrem Wohnmobil oder Fahrzeug installieren möchten. Es sollte an einem trockenen, kühlen und leicht zugänglichen Ort installiert werden.
- Ladegerät an Batterie anschließen: Verbinden Sie das Ladegerät mit den entsprechenden Kabeln und Steckern mit der Batterie. Das Pluskabel wird an den Pluspol der Batterie, das Minuskabel an den Minuspol der Batterie angeschlossen.
- Ladegerät an die Lichtmaschine anschließen: Verbinden Sie das Ladegerät mit den entsprechenden Kabeln und Steckern mit der Lichtmaschine. Das Pluskabel wird an den Pluspol der Lichtmaschine angeschlossen, das Minuskabel an den Minuspol der Lichtmaschine.
- Sicherungen installieren: Installieren Sie Sicherungen sowohl am Plus- als auch am Minuskabel, um das Ladegerät und die Batterie im Falle eines Kurzschlusses vor Schäden zu schützen.
- Testen Sie das Ladegerät: Testen Sie das Ladegerät, um sicherzustellen, dass es ordnungsgemäß funktioniert. Überprüfen Sie die Spannungs- und Stromausgabe, um sicherzustellen, dass der Akku korrekt geladen wird.

Testen und Fehlerbehebung
Nach Abschluss der Verkabelung ist es wichtig, das System zu testen und mögliche Probleme zu beheben. Überprüfen Sie die korrekte Spannungsübertragung, überwachen Sie den Ladevorgang und stellen Sie sicher, dass das Ladegerät wie erwartet funktioniert. Sollten Probleme auftreten, beachten Sie die Anweisungen des Herstellers oder wenden Sie sich an einen Fachmann.
Die Verkabelung eines DC/DC-Ladegeräts ist unkompliziert und kann die Effizienz Ihres Gleichstromsystems deutlich steigern. Mit den in dieser Anleitung beschriebenen Schritten gewährleisten Sie eine erfolgreiche Installation und optimieren die Stromübertragung zwischen Primär- und Zusatzbatterie.